Ads 468x60px

mercoledì 31 agosto 2011

Nfu Oh #66

L'Nfu Oh #66 è una di quelle meraviglie il cui acquisto, nella mia opinione, dovrebbe essere obbligatorio per legge!
Anche stavolta, poche parole e molte foto! Si tratta di un verde lime con un effetto arcobaleno a dir poco stupefacente. Applicazione meravigliosa, una volta che si è usata una base gommosa, due mani di prodotto per ottenere una coprenza perfetta e asciugatura quasi immediata.
L'unico punto dolente, come già preannunciato nei posts precedenti, è la durata, che difficilmente supera le 48-72 ore.
Pronte a vedere un casino di foto?!?

Direct sunlight and almost in the water :D

Direct sunlight (and in the grass!)
Direct sunlight
Direct sunlight, again!
Direct sunlight
Direct sunlight
The last (phew) photo in... direct sunlight! :D


I think that the purchase of Nfu Oh #66 should be required by law!!!
Just a few words and lots of photos. Nfu Oh #66 is a lime green with a crazy rainbow effect. Application is extremely easy but only if you apply a rubberized base (yes, I wrote it again!!!), you only need two coats to obtain a fantastic opacity, and it dries super fast.
Unfortunately, it lasts only a couple of days on nails. 
I love, adore and am mad about it. I wish I could marry it.  *_*

Applicazione / Application
4/5
Asciugatura / Drying time
5/5
Coprenza / Pigmentation
4.5/5
Durata / Longevity
3/5
GIUDIZIO FINALE / OVERALL
4/5

lunedì 29 agosto 2011

Sally Hansen Night Lights

Visto che ho cianciato abbastanza tra reviews preparatorie, note preliminari e metodi smaltiferi dai nomi culinari, mi sembra il caso di dar fuoco alle polveri e farvi vedere il mio smalto holo della settimana!

Il Sally Hansen Night Lights è stato uno dei migliori acquisti della mia vita. L'ho preso senza nemmeno troppa convinzione su un sito di svendite, all'allucinante cifra di £1.
Fa parte della linea Xtreme Wear Hard as Nails, che promette di indurire e non solo abbellire le vostre unghiette.
Night Lights ha una base color grigio scuro/carbone e un finish jelly, il che fa sì che sia piuttosto sheer. Infatti ci sono volute tre mani per ottenere la coprenza desiderata.
Ma ne vale la pena: il risultato finale è uno smalto holo glitter che lascia semplicemente senza parole!
Un punto a suo favore rispetto agli holo "classici" è che dura mooolto di più. L'ho tolto dopo sei giorni ed era ancora impeccabile (se si esclude un leggero "restringimento", a.k.a. effetto shrinkage).
Vista la mia prolissità dei posts precedenti, e visto che in questo caso le foto parlano da sole (e parlano un casino, perché sono davvero tante!), mi eclisso e vi lascio in contemplazione!

Direct sunlight


In the shade
In the shade
Direct sunlight
Direct sunlight
Direct sunlight
Direct sunlight


I know I wrote a lot about holo polishes in terms of reviews, preliminary notes and application methods which evoke cooking... Let's start with the first polish of the Holo Week!

Sally Hansen Night Lights is one of my best purchase ever. I bought it for £1 from a clearance sale. It belongs to the Xtreme Wear Hard as Nails Collection, so this polish should have a strenghten "power" too.
Night Lights has a dark grey/charcoal base with a jelly finish, so as you can imagine it is quite sheer. For this reason I applied three coats of product. The final result is a stunning holo glitter polish on your nails!
Moreover, it lasts a loooot. I removed it after six days and it was still excellent - no tip wear, no chipping, only a little shrinkage.
So, no more chatting and enjoy my photos (or, at least, I hope so!)!


Applicazione / Application
4.5/5
Asciugatura / Drying time
3.5/5
Coprenza / Pigmentation
3/5
Durata / Longevity
5/5
GIUDIZIO FINALE / OVERALL
4/5

Holo polishes - preliminary notes: application and the Sandwich Method

Prima di iniziare con la Holo Week, vorrei condividere con voi un paio di note introduttive.
Come dicevo nella review dell'Aqua Base, la texture degli smalti olografici non è certo tra le più facili da gestire. Per quanto riguarda l'applicazione, mi sono già ampiamente dilungata, tediandovi fino allo sfinimento col mio mantra: usate una base gommosa!

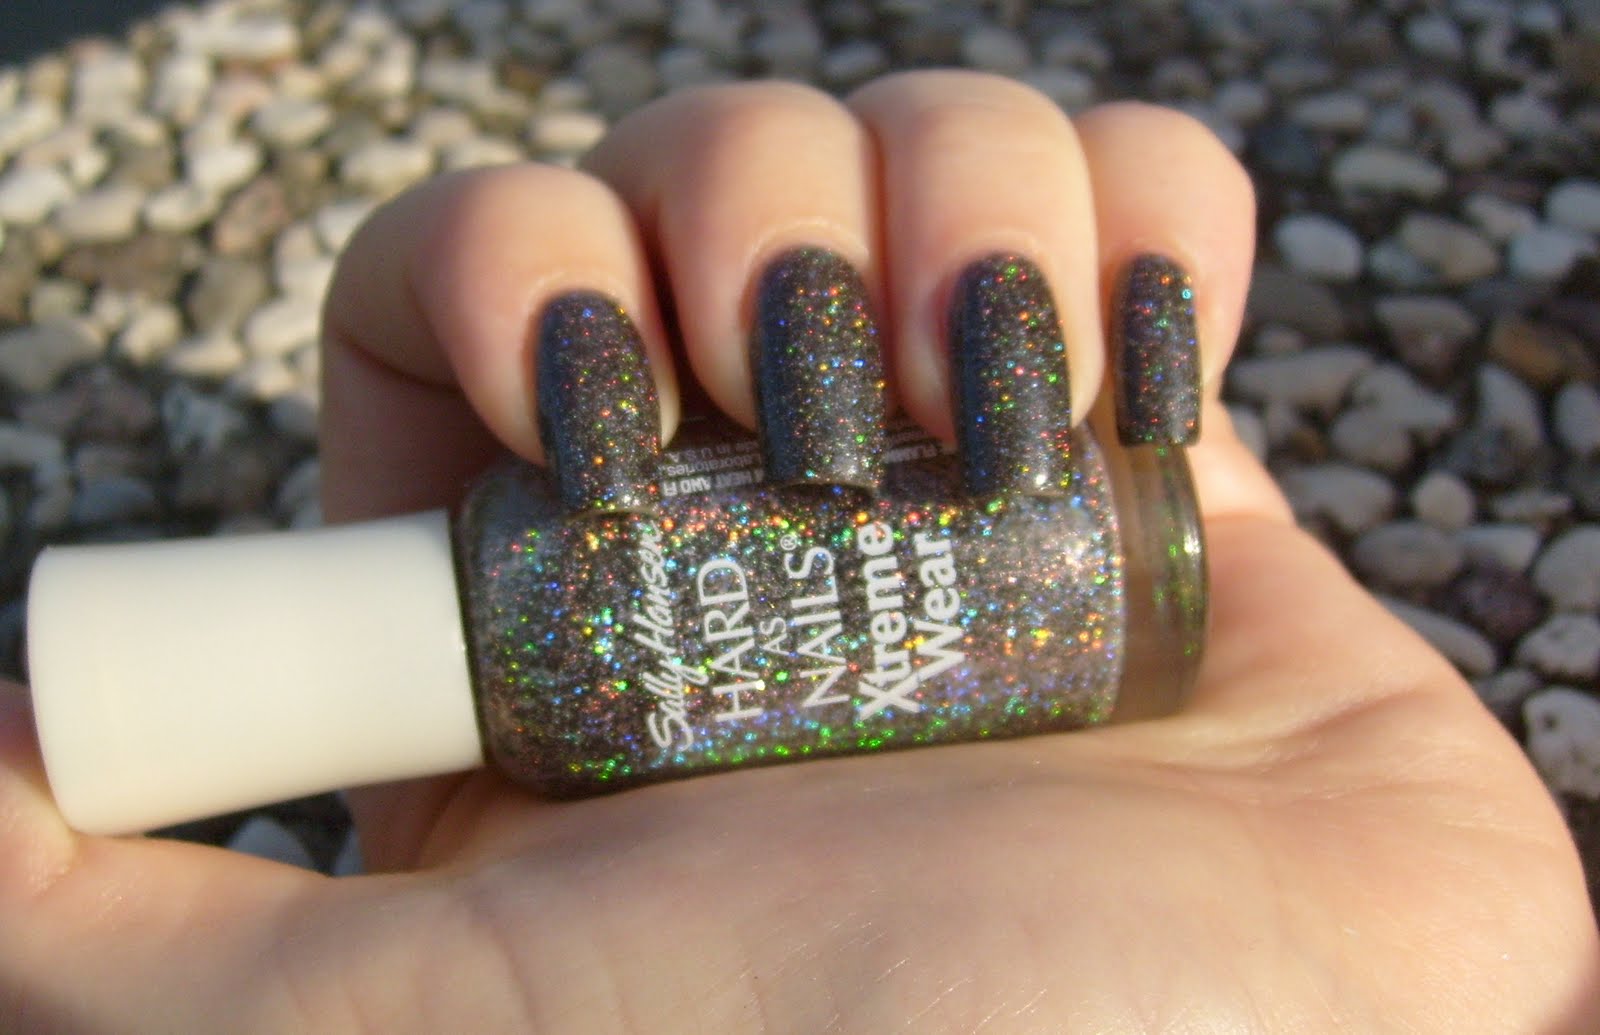
Vorrei invece soffermarmi sulla durata degli smalti olografici, che in genere è scarsa: a parte alcuni miracolosi China Glaze, come IDK e 2nite, gli holo tendono a sfogliarsi e soffrire di chipping entro le prime 48 ore dall'applicazione.
Volete implementare questa performance al limite del cacherrimo (pardon my french!)? Vi propongo il Metodo Sandwich!
No, mettete giù il pan carré, invece vi servirà un top coat.
Ebbene sì.
La regola numero 1 con gli smalti olografici è proprio evitare il top coat, poiché tende a decrescere e smorzare l'effetto holo stesso. Eppure il TC è importantissimo per assicurarsi una buona durata di qualunque altro smalto.
Dunque, semplicemente vi consiglio di stendere il vostro strato di Aqua Base o Orly Bonder, due mani di smalto holo, una di top coat ed infine, nuovamente una mano di smalto holo.
Cercate di evitare che la vostra scelta ricada su un TC ad asciugatura rapida, poiché questi "sciolgono" gli strati sottostanti (per l'appunto per favorire l'asciugatura) e rischiano di complicarvi l'applicazione dell'ultimo strato di smalto colorato o inficiare comunque l'effetto holo.
Naturalmente il Metodo Sandwich è stato testato prima di esservi propinato e, pur non facendo miracoli, prolunga di 24-36 ore la vita degli Nfu Oh e anche di 48 quella dei China Glaze.

Un'ultima nota: come c'è scritto nel mio profilo personale, non ho il dono della sintesi e soffro di una forma acuta di diarrea verbale. Per questo motivo ho deciso di inserire le tabelline riepilogative alla fine di ogni post smaltifero: nel caso di sproloqui particolarmente lunghi, potete scorrere fino alla tabellina ed avere tutte le info necessarie, seppur sommarie.
Ma c'è un altro lato della medaglia: le informazioni date così, in pillole, rischiano di omettere altri aspetti. A causa dei problemi (parziali) nell'applicazione e nella durata, gli holo che vi farò vedere non otterranno un voto pieno. Ma ciò non toglie che siano comunque  stupefacenti e (nella mia opinione) prodotti che non si possono non avere nel proprio stash!
In sostanza: mai giudicare uno smalto dalla tabellina!!!

***Il Metodo Sandwich non è stata una mia "invenzione". Ho letto di questo piccolo accorgimento sul fantastico blog di Chloé, l'ho applicato ed ho notato che funziona meglio con TC NON ad asciugatura rapida***


Credits


A few preliminary notes before the beginning of the Holo Week.
As I wrote in my review of Aqua Base, holo polishes have a particular, very thick texture. For this reason, you will experience some troubles during their application and in terms of longevity.
I won't spend further words about application, I've already wrote a lot about it.
So, let's talk about longevity: holo polishes usually chip and exfoliate approx. 48 hours after application (some China Glaze polishes, like IDK or 2nite, are exceptions to this rule).
Want to implement this bad performance? Try the Sandwich Method (which has nothing to do with pan carré. Mmm, I'm hungry now!)!
The first rule with holo polishes is: avoid the use of top coat, because it ruins or decrease the raibow effect. Well, try this method: apply your base coat, then two coats of your holo polish, a thin layer of top coat and, again, another layer of holo polish.
Avoid fast drying top coats, because they melt the previous layers of polish (in order to accelerate drying time) and this can ruin the rainbow effect.
Of course, I have tried several times the Sandwich Method, it doesn't do miracles but it can extend the life of Nfu Oh polishes of 24-36 hours (even 48 hours when it comes to China Glaze polishes).
A final note: as I wrote in my personal information, I'm not very good at cutting to the chase because I suffer of an acute form of verbal diarrhoea. For this reason I put a schedule at the end of every post. Unfortunately, summarized information can be sometimes misleading. Because of the problems described above, a holo polish would never have the best rate. But that doesn't mean that I don't love these products! On the contrary, I'm crazy in love with them and I think that every girl MUST have (at least) a couple of holo polishes in her stash!
In the end: never judge a polish by its schedule!!!


*** I read about the Sandwich Method on Chloé's blog, and I've noticed that it works better if you don't use fast drying top coats. Anyway, it is not an "original idea" of myself***

sabato 27 agosto 2011

Kiko #235 - Arancio Perlato

Oggi vi presento uno smalto che non mi ha affatto entusiasmato, a parte il colore stupefacente.
Il Kiko #235 Arancio Perlato (Pearly Orange) è tra i primi che ho acquistato di questo brand, ed è un arancione superbrillante dallo shimmer giallo/dorato. Assolutamente spettacolare e perfetto d'estate, probabilmente starebbe meglio su mani abbronzate ma persino sulle mie, cronicamente bianchicce, fa un figurone!
Purtroppo non è molto coprente, e ci sono voluti tre generosi strati per ottenere il risultato che vedete nelle foto.
Secondo, ma non ultimo, problema, è che nonostante l'utilizzo di un fast drying top coat, ci ha messo una vita ad asciugarsi. Infatti su un paio di unghie sono rimasti, chiaramente visibili, i segni delle lenzuola, nonostante io sia andata a letto un'ora dopo aver terminato la manicure.
Infine, l'orrida scoperta quando l'ho rimosso: il malefico macchia!
Nessuna delusione, invece, in termini di durata.
Dunque, se non volete rinunciare ad un colore del genere e ad un prezzo tutto sommato interessante, consiglio caldamente di armarvi di santa pazienza e di stendere due mani particolarmente generose di base coat!

Direct sunlight
Direct sunlight

In the shade

In the shade


Today I'm going to show you Kiko #235 Pearly Orange. First of all I have to say that I was a bit disappointed by this polish.
It is a superbright orange with a yellow/gold shimmer. This shade is really stunning and perfect for the summer, probably it would look better on bronzed skin but (IMO) it looks great also on my chronically pale skin.
Unfortunately it is quite sheer, so you will need three generous coats to "hide" the nail line.
Another problem: this polish really takes a lot of time to dry... I went to bed one hour after I had completed my manicure (with a fast drying top coat) and the morning after I found sheet marks on a couple of nails.
In the end, after I removed it, I discovered that it stains!!! Sgrunt!
Luckily, it lasted a lot on my nails (phew).
So, if you want to buy this polish (I know, the shade is gorgeous and it is cheap) my tips are: you'll need a little patience and two, generous coats of your favourite base product! 


Applicazione / Application
4/5
Asciugatura / Drying time
2/5
Coprenza / Pigmentation
3/5
Durata / Longevity
4.5/5
GIUDIZIO FINALE / OVERALL
3/5

giovedì 25 agosto 2011

Review: Nfu Oh Aqua Base

Nfu Oh Aqua Base

Alzi la mano chi di voi non ama alla follia gli smalti olografici. Ed ora alzi la mano chi non ha mai avuto mostruosi problemi di applicazione con gli stessi.
Personalmente, ho avuto esperienze del tipo: smalto che sguiscia ovunque tranne che dove deve sguisciare, punti dell'unghia con accumulo mostruoso di smalto e punti quasi vuoti, utilizzo di numerose mani di colore per riempire i vuoti di cui sopra, imprecazioni fantasiose stile donna indemoniata.
Un vero peccato, dato che annovero gli smalti holo tra i piccoli piaceri della vita!

Le mie pene sono finite nel momento in cui ho deciso di investire meno di 6€ nell'apposita base della Nfu Oh, l'Aqua Base.
Si presenta nella solita favolosa boccetta a forma di bustier tipica della Nfu Oh, ha un colore bianco lattiginoso ed ha consistenza leggermente più densa delle solite basi. Ha uno strano odore (tutt'altro che forte) che mi ricorda la colla Vinavil (confesso di adorare l'odore della Vinavil!!!!).

La Nfu Oh la descrive così:


Base protettiva a base acquosa, fa respirare l'unghia ed è un primer perfetto per un fissaggio ottimale, in particolare degli smalti olografici. Contiene un'altissima concentrazione di ingredienti attivi. Costruisce un film ricco ed ispessente sulle unghie fragili.

In effetti l'Aqua Base, come accennavo sopra, è più consistente delle solite basi, e ciò contribuisce a rendere l'unghia più spessa e, dunque, più resistente. Il lato negativo è che i tempi di asciugatura sono sicuramente maggiori di quelli, ad esempio, di un Sally Hansen Diamond Strenght. Tuttavia, sono sufficienti solo 4-5 minuti di attesa prima di poter procedere col colore.
Una volta applicata l'Aqua Base, stendere lo smalto holo sarà ridicolmente semplice, quasi automatico. Il pennellino scorrerà magicamente, il colore andrà nei punti giusti... Una gioia per gli occhi, insomma (nonché un sollievo per le coronarie).
Altro grosso lato positivo, saranno necessari meno strati di colore per ottenere la medesima copertura, quindi meno tempo necessario per completare la vostra manicure e meno spreco di prodotto.
Infine, secondo la Nfu Oh l'Aqua Base renderebbe maggiore l'effetto holo. Vi dirò: da quello che ho potuto vedere io, non è così. Se avete voglia di approfondire, vi rimando al post di Lacquerized che ha la mia stessa opinione, nonché a quello di The Nailphile che, invece, è di tutt'altro parere.

In breve: straconsiglio l'acquisto dell'Aqua Base! Vi renderà più facile la vita, più veloci i tempi di "pittaggio unghie" e vi farà risparmiare strati di preziosi smalti holo! E' ottimo anche con tutti quegli smalti con formula particolare fluida, che tendono a strabordare verso le cuticole, poiché vi aiuterà a tenere lo smalto "in carreggiata".


How many maniacs of holographic nail polishes are there among you? And how many of you experienced big issues during application of them?
Well, I have experienced: nail polish that slides everywhere, accumulation of nail polish in certain points of the nail and other points completely naked, lots of coats to obtain a good opacity and many, many swearwords coming out of my mouth.
That's too bad, expecially because I think that holo polishes are wondeful, fantastic, stunning, etc.

Luckily, after I bought Nfu Oh Aqua base, all the problems listed above disappeared.
Aqua Base is a milky white base coat, it comes in a bottle with the usual Nfu Oh shape and is a bit thicker than other similar products. It has a strange smell - similar to Vinavil's one (Vinavil is a very popular italian glue).
According to Nfu Oh it is:


Protective water based breathable primer for good fix with hologram polish wear     especially. Vehicle unusal high concentration of active ingredients. Water base emulsion, buils a rich, flexible smooth, thickening film on weak nails.

As I wrote above, Aqua Base is thicker than other products. For this reason, it dries less fast than, i.e., Sally Hansen Diamond Strenght. Anyway, it takes only 4 or 5 minutes to dry.
Once you applied Aqua Base, application of holo polish will be ridiculously easy, almost authomatic.
Moreover, you will need less coats of polish to obtain a good opacity; that means that your manicure will be ready in less time and you will save product too!
According to Nfu Oh, Aqua Base should also improve the rainbow effect. Mmm, in my experience, I didn't see any enhancement of the holo effect. If you want to read other bloggers' opinions about this, Lacquerized agrees with me, but The Nailphile can see a stronger rainbow effect after using Aqua Base.


In the end: I strongly recommend this product, expecially if you're a holo fanatic! But you can also use it underneath all those polishes with a very smooth formula and not so easy to "control". 

Where to buy? You can buy Nfu Oh Aqua Base from Viis (Estonia), Framenails (France) or Fabulous Street (US). Please note that I have never bought from Fabulous Street, so please check other customer reviews.

martedì 23 agosto 2011

Models Own Evergreen

Altro post, altro smalto Models Own! Ne avevo davvero parecchi nella scatola degli untrieds, e stavano lì da quasi un anno, per cui in questo periodo ne sto indossando quasi uno dietro l'altro, alternandoli con gli smalti olografici. Vi anticipo sin d'ora che ho arbitrariamente deciso che la prossima sarà la Holo Week, per cui se siete delle amanti di questo finish, rimanete sintonizzate!

Ma torniamo a noi. Mi ci è voluto non poco per capire a quale finish appartenesse l'Evergreen. Si tratta di un verde trifoglio brillante dal finish shimmer ma con un tocco di metallizzato.
Non è particolarmente coprente, quindi ci sono volute tre passate (non eccessivamente cariche) per ottenere il risultato che vedete nelle foto. La formula non è niente male, si stende bene e senza problemi di sorta e i tempi di asciugatura sono piuttosto rapidi.
Anche la durata è stata molto soddisfacente, cinque giorni prima di iniziare a vedere un leggero consumo in corrispondenza delle punte delle unghie, al che l'ho tolto più per voglia di cambiare che per reale necessità.
L'ho già scritto in precedenza in occasione del mio post sul Golden Peach, ma repetita juvant: gli smalti Models Own NON sono Big3Free, come testimonia il loro odore più acre e forte rispetto ai prodotti di altri brands.
Assolutamente consigliato, previe due mani di base coat, soprattutto ora che è in offerta a £2.50!


Direct sunlight

Direct sunlight

In the shade


Another post, another nail polish by Models Own! 
I really had a lot of polishes by this brand in my "untrieds" box, they stayed there for almost a year so one month ago I decided that they finally deserved my attention! 
A little anticipation: my favourite finish is holo, expecially during summer, so I arbitrarily decided that the next week it will be THE HOLO WEEK, so if you're another "crazy for holo" lady, stay tuned!

So, Models Own Evergreen... It was hard to understand which is the finish of this polish. It is a brilliant clover-green with a shimmer finish, but with a touch of metallic.
It is quite sheer and it took three thin coats to obtain opacity. I like its formula, application is good and it dries quite fast. 
It lasted five days on my nails, then I noticed a little tip wear. I removed it because I wanted to change colour more that for real necessity.
As I wrote in my post on Golden Peach (repetita juvant!!!) Models Own polishes are NOT Big3Free, as you may notice from their smell, which is stronger than other brands' polishes. 
Anyway, I recommend this polish, expecially now that it is on sale and costs only £2.50!


Applicazione / Application
4/5
Asciugatura / Drying time
4/5
Coprenza / Pigmentation
3.5/5
Durata / Longevity
4.5/5
GIUDIZIO FINALE / OVERALL
4/5

domenica 21 agosto 2011

UK Pigments - Barry M and Models Own


Visto che la supersvendita di Models Own si avvicina, ho pensato di mostrarvi i pigmenti in mio possesso: magari gli swatches vi saranno di ispirazione per un eventuale ordine!
E già che ero nelle spese, ho inserito anche l'unico pigmento Barry M in mio possesso, ispirata dal post de La Bisbetica su un prodotto analogo.
Today I'm going to show you some swatches of my Models Own pigments: since their sale is approaching, maybe you need some inspiration for your wishlist! 
Moreover, I added the swatches of the only Barry M pigment I own.

Cliccate sulle foto per ingrandirle / All images are clickable


Direct sunlight, L-R and Wet/Dry: Barry M Opal, M.O. Jade Green, Denim Blue, Black&Green Sparkle, Navy&Gold Sparkle

In the shade, L-R and Wet/Dry: Barry M Opal, M.O. Jade Green, Denim Blue, Black&Green Sparkle, Navy&Gold Sparkle

Inizierei proprio da "lui": Barry M Fine Glitter Dust #21 - Opal.
Barry M è un brand inglese e low cost, famoso per aver proposto un dupe quasi identico dello smalto in edizione super-mega-ultralimitata di Chanel, Jade.
Il pigmento Opal ha una base nera arricchita di qualche miliardo di glitter finissimi di un bel verde brillante. Da asciutto non è molto pigmentato, ma soprattutto i glitterini tendono a svolazzare via o a rimanere incollati sul pennellino. La situazione migliora molto se usato bagnato (nel mio caso, col Fix Plus home made), ed è ottimale se si usa come base un gel per glitter o una base glitter come la Too Faced Shadow Insurance Glitter Glue.
The first pigment I show you is Barry M Fine Glitter Dust #21 - Opal.
Barry M is an english, low cost brand. When the Internet community discovered that it sells a nail polish which is almost a dupe of the ultralimited edition Chanel Jade, it became very famous!
Opal has a black base enriched with lots and ultrafine glitters in bright green. As you can see in the photos, it is not very pigmented if used dry. Moreover, glitters tend to flutter away or they remain "stuck" in the brush. The situation is greatly improved when pigment is used wet (in my case, with home made Fix Plus), but the best thing to do is to use a glitter gel as a base or a primer like Too Faced Shadow Insurance Glitter Glue.


Opal, direct sunlight, wet/dry
Opal, in the shade, wet/dry

Black&Green Sparkle e in Navy&Gold Sparkle sono della stessa "famiglia" del Barry M: base molto scura (nera per il primo, navy per il secondo) con abbondanza di glitter ultrafini. Anche le performances sono del tutto simili: pigmentazione discutibile da asciutti, cambiano completamente aspetto se usati bagnati. Identiche raccomandazioni: se non volete perdervi per strada tutti quei glitters, usate una base apposita!
Models Own in Black&Green Sparkle and in Navy&Gold Sparkle are very similar to Barry M Opal in terms of aspect and performances: they have a dark base (black the first one and navy the second one) and millions of ultrafine glitter. They're not so pigmented if used dry and look much better if used wet. My tips are the same: use a primer or a base for glitters, if you don't want to "lose" all those glitters!

Black&Green, direct sunlight, wet/dry
Black&Green, in the shade, wet/dry
Navy&Gold, in the shade, wet/dry
Navy&Gold, direct sunlight, wet/dry

Il Models Own in Denim Blue è indubbiamente il mio preferito del gruppo. Molto pigmentato già da asciutto, alla luce solare diretta mosterà uno shimmer pazzesco e multicolour quasi acceccante. Si sfuma molto bene ed è anche quello che dura più a lungo sulla palpebra.
Models Own in Denim Blue is definitely my favourite of the bunch. It is very pigmented even if used dry and in direct sunlight it shows a crazy, gorgeous and multicolour shimmer. It blends very well and it lasts for a lot of hours on your eyelid.

Denim Blue, direct sunlight, wet/dry
Denim Blue, in the shade, wet/dry


  Anche il Models Own in Jade Green vi mostrerà, alla luce solare diretta, uno splendido effetto shimmer. Ha una buona pigmentazione anche da asciutto nonché buone sfumabilità e durata.
Models Own in Jade Green is another great pigment, it has a good pigmentation if used dry and it has a good longevity. Like Denim Blue, in direct sunlight it shows a gorgeous shimmer and blends well too.  


Jade Green, direct sunlight, wet/dry
Jade Green, in the shade, wet/dry


Un'ultima osservazione: per sfruttare al meglio i primi tre pigmenti ed ottenere un effetto davvero "strong", al limite dello strobo (!), usate una base apposita come detto sopra, prelevateli con un applicatore a spugnetta, andate giù di Fix Plus ed applicate il pigmento sulla vostra palpebra tamponando.
My last tip: if you want to obtain a really strong effect with glitter pigments, use an ad-hoc base as stated above, take a little quantity of pigment with an eye applicator, spray it with Fix Plus and gently dab the colour on your eyelid.


Where to buy? Barry M website or in authorized shops, £4.59 per 3.5g, Models Own website or in authorized shops, £5 per 3.5 g.

giovedì 18 agosto 2011

Layla Fluo Colour F05

Non occorrono molte parole per presentare alle lettrici italiane il brand Layla. E' sicuramente tra i più conosciuti del Bel Paese, nonché una delle poche alternative per comprare buoni cosmetici ad un prezzo (quasi!) umano. Recentemente ho letto che Layla ha presentato al Cosmoprof Las Vegas una collezione di smalti magnetici (già disponibile in Italia), e francamente sono molto felice di questa "irruzione" tricolore nel mercato americano!

Lo smalto del giorno fa parte della linea Fluo Colour, in realtà dedicata a chi ha le unghie finte o ricostruite. Ovviamente me ne sono fregata della raccomandazione, troppo conquistata da cotanto fuchsia brucia-retina, e l'ho applicato con molto entusiamo e dopo due mani di base coat, tanto per andare sul velluto.
L'F05 è, per l'appunto, un fuchsia dal finish neon e con sottotono blu, che spero di essere riuscita a rendere nelle foto.
Nessuna controindicazione di uso sulle unghie naturali, applicazione agevole ma, vista la texture decisamente fluida, consiglio di fare degli strati piuttosto sottili per evitare di trovarvi sbavature in ogni dove e passare mezza giornata a pulirle con un cotton fioc (o col pennello da correttore ELF per le più attrezzate), desiderando di azzannarvi le cuticole e strapparle via a morsi, sbaffi di smalto inclusi.
Sono state necessarie tre mani per ottenere una buona coprenza e si asciuga veramente velocemente, con un finish lucido (ma ho comunque applicato un top coat). Nulla da ridire sulla durata, che è arrivata a cinque giorni.
Inforcate pure gli occhiali da sole e godetevi le foto, se ne avete voglia!

In the shade

In the shade

In the shade

Artificial light with flash and the blue undertone

Layla is one of the most famous brand here in Italy: it has a wide range of cosmetics and nail polishes and it is not so expensive. Layla has recently presented its magnetic nail polishes collection at the Las Vegas Cosmoprof, I'm really happy that an italian brand is entering the american market!
The polish of the day is F05 from Fluo Colour Collection, which is dedicated to ladies with gel or acrylic nails. Obviously I didn't care about this note, conquered by that retina-burning fuchsia, and I applied it with great enthusiasm and two coats of base coat.
F05 is a bright fuchsia with blue undertone and neon finish and it has no contraindication for use on natural nails.

Application is easy, but please pay attention to its very smooth texture! Use thin layers of product if you don't want to spend half a day cleaning your cuticles with a cotton swab (or ELF concealer brush for the best equipped ladies). 
It took three coats to get good coverage and dries very quickly, with a glossy finish (but in any case I applied a top coat). Nothing to complain about longevity: five days before chipping.
Hope you enjoyed my pics, have you put your sunglasses before looking at them?

Applicazione / Application
4/5
Asciugatura / Drying time
5/5
Coprenza / Pigmentation
3.5/5
Durata / Longevity
4/5
GIUDIZIO FINALE / OVERALL
4.25/5

martedì 16 agosto 2011

Zoya Adina

Buongiorno a tutte!
Tornate dalle ferie? Io purtroppo sì, stavo troppo bene al mare con le coccole della mamma! :(
Mi devo scusare per la mancanza di posts, ma la mia Internet Key non ne ha voluto sapere di andare oltre al GPRS (in ferie anche lei?), rendendomi pressoché impossibile navigare od uploadare foto.
Vorrei farmi perdonare mostrandovi uno degli smalti più pazzeschi su cui abbia mai messo le mie zampacce, ovvero Zoya Adina. Appartiene ad una collezione del 2010, la Reverie, e si tratta di uno spettacolare duochrome viola chiaro e verde.
E' mia abitudine, prima di lanciarmi in acquisti oltreoceanici, spulciare attentamente molte reviews, motivo per cui ho titubato non poco prima di ordinare Adina: infatti, alcune bloggers avevano rilevato tempi biblici per l'asciugatura di questa meraviglia. Alla fine ho ceduto e mi è andata bene: asciugatura rapida e perfettamente nella norma!
L'applicazione è talmente semplice da essere quasi automatica, anche grazie al fantastico pennellino tipico degli smalti Zoya, piuttosto sottile.
Due mani per ottenere una buona coprenza, durata appena inferiore alla media di Zoya (che, nella mia esperienza, si attesta intorno alla settimana, mentre Adina ha iniziato a rovinarsi dopo sei giorni).
Adina è nella mia top ten degli smalti più fantasmagorici di tutti i tempi, e lo consiglio in modo spudorato a tutte quante!

In the shade
In the shade
 
In the shade
Direct sunlight
Direct sunlight
Direct sunlight


Hi everyone!
Are you still on vacation? Unfortunately mine has just finished. :(
I have to apologize for the lack of posts, but I had Internet issues and it was impossible to browse or upload photos. Sgrunt!
But I'm back with one of the cutest nail polish ever, Zoya Adina. It belongs to the Reverie Spring Collection (2010), luckily it is not a limited edition! Adina is a spectacular light purple and green duochrome
.
Before buying overseas, I read carefully a lot of reviews; for this reason, I hesitated a little before ordering Adina: infact, some bloggers wrote that it takes biblical times for the drying of this wonder. But, in the end, I capitulated and I ordered it: I went well, phew! Drying time perfectly normal!
Application is extremely simple and easy, thanks to the fantastic Zoya brush, which is rather thin.
Two coats to get good coverage, longevity is high - Zoya's nail polishes, in my experience, last approx. a week, while Adina began to ruin after six days.
Adina is in my top ten of the most phantasmagorical nail polishes of all time, and I highly recommend it to all of you!

Applicazione / Application
5/5
Asciugatura / Drying time
4.5/5
Coprenza / Pigmentation
4.5/5
Durata / Longevity
5/5
GIUDIZIO FINALE / OVERALL
4.75/5